TrainingSep 20, 202610 min read
Lire en français·Auf Deutsch lesen·Leer en español·Przeczytaj po polsku
Deadlift Form: Hinge Mechanics, Bracing, and the Faults That Hold You Back
The deadlift is the simplest lift to describe and one of the easiest to do badly, because every fault hides behind the bar still going up. Here is the full sequence, from setup to lockout, plus the five faults that cost the most strength and how to fix each one.
Reviewed by the HyperBody team

The deadlift is the simplest lift in the gym to describe: pick the bar up, put it down. It is also one of the easiest to do badly for years without noticing, because the deadlift's defining feature is that bad reps still go up. A squat with broken technique buries you. A bench with broken technique stalls on your chest. A deadlift with a rounded back, yanked slack, and hips shooting skyward still locks out, and the lifter walks away convinced the rep was fine.
That is why deadlift form is worth learning deliberately rather than absorbing by trial and error. The lift rewards a precise setup and a patient pull more than any other movement, and the difference between a good puller and a struggling one is almost never effort. It is sequence.
A Hinge, Not a Squat
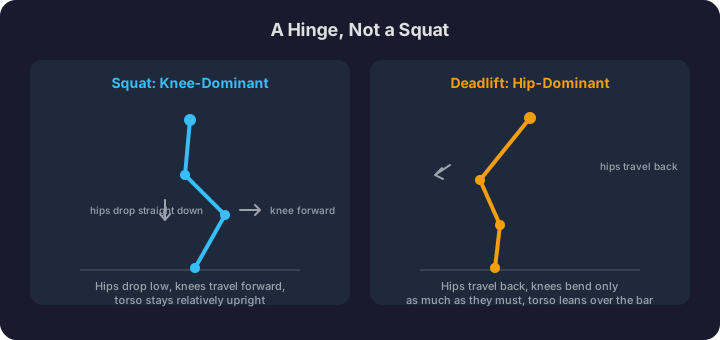
The single most common conceptual error is treating the deadlift like a squat with the bar in your hands. They are different patterns. A squat is knee-dominant: the hips drop low, the knees travel forward, and the torso stays relatively upright. A hinge is hip-dominant: the hips travel backward and forward while the knees bend only as much as they must, and the torso leans over the bar.
In a deadlift your hips start well above squat depth, your shins stay close to vertical, and the work of the lift is your hips driving forward, powered by glutes and hamstrings, while your back's job is to hold a rigid shape, not to lift the weight by straightening. If your deadlift setup looks like the bottom of your squat, your knees are blocking the bar's path before you have even pulled.
A quick way to feel the difference: stand a few centimeters from a wall, facing away, and push your hips back to touch it without bending your knees more than slightly. That backward reach of the hips, with the chest tipping over as a counterweight, is the hinge. Every good deadlift starts and ends with it.
The Setup, in Order
A deadlift is mostly decided before the bar leaves the floor. Run the same checklist every rep, in the same order, and the pull becomes repeatable.
Start with the bar over your midfoot, roughly an inch from your shins, cutting your foot in half when you look down. Not against the shins, not out over the toes. Midfoot is where your balance lives, and the bar wants to travel in a vertical line above it.
Take your grip just outside your legs, then bend your knees until your shins touch the bar. Do not let the bar roll away when they do.
Now set your hips. They belong between your knees and your shoulders: higher than a squat, lower than a stiff-legged bow. The exact height depends on your limb lengths, and the test is simple: when everything is tight, your shoulder blades should hang directly over the bar, with your shoulders just slightly in front of it. If your hips are too low, your knees push the bar forward. Too high, and your back takes over the work your legs should start.
Engage your lats before you pull. The cue that works for most people: squeeze oranges in your armpits, or imagine bending the bar around your shins. This pins the bar against you and stops it drifting away mid-pull.
Keep your neck neutral, eyes on the floor a couple of meters ahead, not craned up at the mirror. Your spine is one unit from skull to tailbone, and it all stays in line together.
Bracing: The 360-Degree Breath
Before the pull comes the breath, and this is worth doing properly because it is what protects your spine under load.
Bracing is not sucking in your stomach, and it is not just pushing your belly out. Take a deep breath into your midsection, not your chest, and then push that air outward in every direction at once: into your stomach, into your sides, into your lower back. Imagine inflating a ring around your whole waist, then tightening every muscle around that ring as if you were about to take a punch. If you wear a belt, this is exactly what the belt is for: something to push against all the way around, not a crutch to hang your torso on.
Take the breath at the top, before you bend down to the bar, or in your setup position, whichever lets you stay tightest. Hold it through the rep. Reset it every rep on heavy sets. A deadlift pulled without a brace is a deadlift where your spine is negotiating with the load instead of being sealed off from it.
The Pull
With the setup built and the brace set, the pull itself has a sequence, and the first part of it is patience.
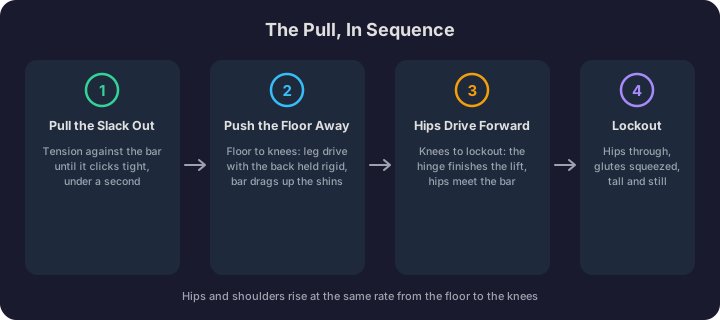
First, pull the slack out of the bar. Before the plates leave the ground, pull up against the bar just hard enough to feel it click against the top of the plate holes and feel your whole body tighten against the load. This takes under a second and turns the start of the lift from a jerk into a press.
Then push the floor away. Do not think about hauling the bar up with your back; think about leg-pressing the ground downward. The first phase of the pull, from the floor to the knees, is leg drive with the back held rigid.
The bar drags up your legs the entire way. Shins first, then thighs. If the bar swings away from you, even a centimeter, the load on your lower back multiplies and the lift gets heavier than the plates say it is.
Your hips and shoulders rise at the same rate from the floor to the knees. This is the marker of a pull where the legs are doing their job. Past the knees, the hinge finishes the lift: drive your hips forward to meet the bar.
Lockout is standing up straight: hips through, glutes squeezed, shoulders back, tall and still. It is not leaning backward. Hyperextending the lockout adds nothing to the lift and asks your lower back for an arch under maximum load for the benefit of nobody.
Fault: Rounding Under Load
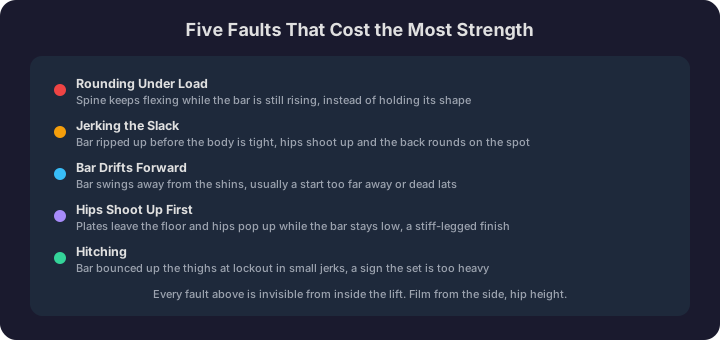
The most feared deadlift fault deserves the most honest treatment. Watch the heaviest pulls at any powerlifting meet and you will see flexed spines, including in the upper back, on successful, uninjured lifters. Some spinal flexion under maximal load is common even among elite pullers, and a modestly rounded upper back held rigid is a position some strong lifters pull from deliberately.
The issue is not flexion as a crime. The issue is uncontrolled flexion beyond what your tissues are trained for: a back that changes shape during the rep, collapsing further as the pull grinds, especially in the lower spine, under loads near your limit. A spine that holds its shape, even an imperfect shape, is doing its job. A spine that is still flexing while the bar is still rising is absorbing the load instead of transmitting it.
The fix is layered. Rebuild the setup so your lats are engaged and your brace is set before the slack comes out. Drop the load to where your shape holds for every rep of the set, and treat that as your true working weight. Then build capacity gradually, because backs adapt to loading like everything else. What you should not do is yank maximal singles with a folding lower back and call it specificity.
Fault: Jerking the Slack
The lifter dives down, snatches the bar, and rips it upward in one violent motion. Sometimes the bar flies up; more often the hips shoot up, the arms jolt, and the back rounds on the spot, because the body was loaded suddenly before it was tight. The fix is the slack pull described above: tension first, then drive. The bar should feel heavy in your hands before it leaves the floor.
Fault: The Bar Drifts Forward
If the bar swings away from your shins on the way up, the cause is almost always one of two things: the bar started too far from you, or your lats were asleep. Reset the bar over midfoot and use the bending-the-bar cue to drag it up your legs. Lifters with this fault often see their deadlift jump just from fixing the start position, because they have been lifting extra leverage all along.
Fault: Hips Shoot Up First
The plates leave the floor and your hips pop up while the bar stays low, turning the lift into a stiff-legged pull your back has to finish. This usually means your hips started too low for your build, or the weight overwhelmed your leg drive. Film a rep from the side: if your hips rise faster than your shoulders off the floor, raise your starting hip position slightly and re-test, and think about pushing the floor rather than lifting the bar.
Fault: Hitching
Hitching is bouncing the bar up your thighs at lockout, resting it on your legs and ratcheting upward in small jerks. It appears when the load is beyond your lockout strength, and it teaches a broken finishing pattern while grinding the bar to a halt repeatedly under load. If you hitch, the set was too heavy. Build the lockout with Romanian deadlifts and pulls against a controlled tempo instead of rehearsing the hitch.
Variations and When to Use Them
The conventional deadlift is the default for a reason: the longest range, the most complete hinge, the simplest loading. But the variations are tools, not compromises.
Sumo, with a wide stance and hands inside the knees, keeps the torso more upright and shortens the range. Lifters with hips that fight the conventional stance, or long torsos and short arms, often pull more comfortably and more safely this way. The trap bar puts the load at your sides instead of in front, blends the hinge with more knee bend, and is the friendliest variation for beginners and for athletes who want loaded hinging without the technical overhead. The Romanian deadlift starts from the top, stops mid-shin, and keeps constant tension on the hamstrings and glutes; it is the best teaching tool for the hinge itself and the best hypertrophy assistance for the muscles that drive the pull.
A reasonable rule: pick the main variation your body pulls best, and use the Romanian deadlift as the assistance lift behind it.
Programming the Pull
The deadlift takes more out of you per set than any other lift, and it tolerates sloppy fatigue worst. Most lifters do well pulling heavy once per week, with a second lighter or variation day at most. Keep working sets in the one-to-five rep range when the goal is strength, because long grinding sets of deadlifts are where technique goes to die. Every rep should start from a dead stop and a fresh brace, which is the entire point of the lift's name. Quality reps, modest volume, patience across months. The deadlift rewards boring consistency more than any lift in the gym.
Check Your Pull on Camera
Almost every fault in this article is invisible from inside the lift. A rounding back feels like effort. Drifting bar path feels like heavy. Hips shooting up feels normal because it is what you have always done. The fix is the same as for the bench press, whose most common errors we covered in the bench press mistakes guide: film yourself from the side, at hip height, far enough back to see the whole bar path.
If you want more than your own eyes on it, HyperBody's video form check analyzes deadlift footage rep by rep and flags the exact faults above: back rounding through the rep, bar drifting off the legs, hips rising early, lockout hyperextension. Upload one working set, fix the single biggest fault it finds, and re-film next week. One corrected fault at a time is how a deadlift gets rebuilt.
The Bottom Line
Hinge, do not squat. Bar over midfoot, shins close, hips between knees and shoulders, lats squeezing the bar in, neck neutral. Breathe into your waist and brace in every direction. Pull the slack out, push the floor away, drag the bar up your legs, hips and shoulders rising together, and finish tall without leaning back. When a fault appears, drop the load to where the shape holds and build back up. The deadlift is the most honest lift in the gym once you stop letting completed reps count as correct ones.
More field notes.

The 7 Most Common Bench Press Mistakes (And How to Fix Them)
The bench press looks like the simplest lift in the gym, which is exactly why it collects more technique errors than any other. Here are the seven mistakes that cost you the most strength and shoulder health, and the specific cue that fixes each one.

How Deep Should You Squat? Depth, Mobility, and Safety
Squat depth starts more arguments than almost any other topic in the gym, and most of the arguing ignores both the evidence and your individual anatomy. Here is what the research actually says about depth, knees, and muscle growth, and how to find the depth that fits your body.

How to Start Working Out: A Beginner's Guide to Your First 12 Weeks
A simple, evidence-based plan for your first three months of training. What to do, how much, and why consistency beats intensity when you're starting your fitness journey.
More on HyperBody