TrainingSep 6, 20269 min read
Lire en français·Auf Deutsch lesen·Leer en español·Przeczytaj po polsku
The 7 Most Common Bench Press Mistakes (And How to Fix Them)
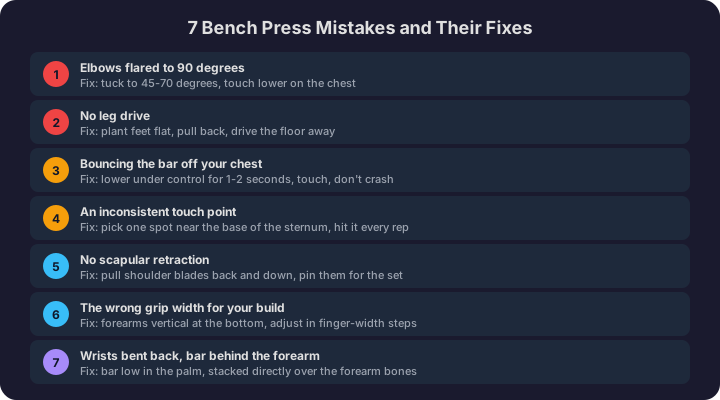
The bench press looks like the simplest lift in the gym, which is exactly why it collects more technique errors than any other. Here are the seven mistakes that cost you the most strength and shoulder health, and the specific cue that fixes each one.
Reviewed by the HyperBody team

The bench press looks like the simplest lift in the gym: lie down, lower the bar, push it up. That apparent simplicity is exactly why it collects more technique errors than any other major movement. Nobody thinks they need to learn how to lie on a bench, so nobody does, and the result is visible on any Monday evening: flared elbows, bouncing bars, feet tap-dancing on the floor, and a lot of lifters wondering why their bench has not moved in a year and why their shoulders ache.
The flat barbell bench press is worth doing properly. Done well, it is one of the most productive upper body movements available, loading the chest, front delts, and triceps through a long range with more weight than any other pressing pattern allows. Done badly, it is a shoulder grinder with a low ceiling. Here are the seven mistakes that show up most often, why each one happens, what it costs you, and the cue that fixes it.
Mistake 1: Elbows Flared to 90 Degrees
This is the classic, and it usually comes from instinct: flaring the elbows straight out to the sides feels like it puts the chest in charge, and from the lifter's own viewpoint looking down, it looks symmetrical and correct.
What it costs is shoulder health and pressing power at the same time. With the upper arms at 90 degrees to the torso, the bottom of the rep places the shoulder in a heavily abducted, internally loaded position, the exact configuration that irritates the front of the shoulder under repeated heavy load. Mechanically it also strands the bar in a weak line: the elbows drift behind the bar, and the press turns into a fight to recover position rather than a clean drive.
The fix is to tuck the elbows to roughly 45 to 70 degrees from your torso, closer to a capital A than a capital T when viewed from above. The cue that works for most lifters: think about bending the bar into a horseshoe, or pulling your elbows slightly toward your hips as you lower. Touch the bar lower on your chest than you think you should, around the base of the sternum, and the elbow angle largely sorts itself out.

Mistake 2: No Leg Drive
Watch a struggling bencher's feet: they shuffle, lift onto the toes, dance around mid-set, or dangle on the bench frame. The legs have been written off as passengers because the bench press is an "upper body lift."
It is not. The bench press is a full body lift performed lying down. Your legs anchor the entire system: planted feet let you push the floor away, drive tension up through your glutes and torso, and give the bar a rigid platform to press from. Without leg drive you are pressing off a soft mattress; with it, you are pressing off concrete. Lifters who learn leg drive routinely find five to ten percent more on the bar with no change in upper body strength.
The fix: before unracking, place your whole foot flat on the floor, pulled back toward your hips as far as comfort and flexibility allow, and keep it nailed there for the entire set. The cue is to drive the floor away from you, horizontally, as if trying to slide yourself up the bench, while your glutes stay in contact with the pad. Set the feet once, then forget about them; if they move during a set, the set started before you were ready.
Mistake 3: Bouncing the Bar Off Your Chest
The bounce is a borrowed rep. Dropping the bar fast and rebounding it off the ribcage uses your chest as a trampoline, and the rebound carries the bar through the hardest few inches of the press. It happens because it works, in the short term: the bounce lets you handle more weight, and more weight feels like progress.
The costs are stacked. The trampoline inches are precisely the deep, stretched portion of the rep where the chest does its most valuable work, so the bounce deletes the most productive part of the range. It hands you a number your muscles did not earn, which means every future session is anchored to a load you cannot actually press. And rebounding a loaded barbell off the sternum is exactly as kind to your ribcage as it sounds.
The fix is control: lower the bar in a deliberate one-to-two seconds, touch your shirt without compressing your chest, pause for a beat, and press. The cue "touch, don't crash" covers it. Expect the bar weight to drop when you remove the bounce. That drop is not lost strength; it is the honest number revealing itself, and it will climb faster than the dishonest one did.
Mistake 4: An Inconsistent Touch Point
One rep touches the nipple line, the next lands near the throat, the third somewhere south of both. Each touch point creates a different pressing angle, a different elbow position, and a different bar path, which means you are practicing three different lifts in one set. This usually happens because the lifter has never chosen a touch point at all; the bar simply lands wherever fatigue and inattention deliver it.
The cost is consistency, and consistency is where strength lives. A groove only gets stronger if you press through the same groove every time. Wandering touch points also tend to drift high as fatigue sets in, dragging the elbows back out to the flared position from mistake one.
The fix: pick one touch point that matches your tucked elbow angle, for most lifters somewhere between the nipple line and the base of the sternum, and treat it like a target painted on your shirt. Same spot, every rep, every set, warm-ups included. Light warm-up sets are exactly where the groove is rehearsed, not throwaway work to rush through.
Mistake 5: No Scapular Retraction
Lie down flat, shoulders loose, unrack, press: this is how almost everyone benches until someone teaches them otherwise. The missing ingredient is the upper back. Without it, the shoulder blades slide around on the bench, the shoulders roll forward at the bottom of each rep, and the whole pressing platform is built on sand.
The cost is double. Power leaks first: a loose upper back shortens your effective range less but absorbs your drive, like pressing while lying on a waterbed. Shoulder stress comes second: when the shoulder blades are not pinned, the shoulder joint takes the bottom position in its least supported posture, which is where benching gets its bad reputation.
The fix happens before the bar moves. Pull your shoulder blades back and down, as if tucking them into your back pockets, then pin them against the bench and keep them there for the whole set, including the lockout. The cue: squeeze a pencil between your shoulder blades and do not drop it. Your chest should rise toward the ceiling and a modest arch should appear in your upper back; that is the platform forming. If you lose the squeeze at lockout by shrugging the shoulders forward to reach higher, you have traded the platform for two inches of range nobody is grading you on. Strong retraction is also trainable: rows and pull-ups build the very musculature that holds this position under load.
Mistake 6: The Wrong Grip Width for Your Build
Grip width gets copied rather than chosen. A lifter sees a wide-grip powerlifter or a close-grip specialist, copies the hand position, and inherits a grip that fits someone else's arm length and shoulder width.
Too wide for your build, and the bottom position forces the flared-elbow geometry from mistake one regardless of how hard you try to tuck, while the shoulders absorb the stretch the chest should be getting. Too narrow, and the lift becomes a triceps press with a wandering bar path and elbows that drift forward. Both versions leave strength on the table and load the wrong tissue.
The fix is a simple test: at the bottom of the rep, with the bar touching your chest, your forearms should be close to vertical when viewed from the front. Have someone film you straight-on, or check yourself: hands too far outside vertical forearms means narrow your grip, forearms angled inward means widen it. For most lifters this lands around one and a half hand-widths outside the shoulders, but your levers get the final vote, not a formula. Adjust in finger-width increments and give each change a week before judging it.
Mistake 7: Wrists Bent Back, Bar Behind the Forearm
Look at a new bencher's wrists at the bottom of a rep: cocked back at 45 degrees, knuckles pointing at the wall behind them, the bar sitting in the fingers rather than over the forearm. It happens because the bar gets placed in the middle of the palm, where gravity folds the wrist backward as soon as real load arrives.
The cost is force and comfort. Force travels in a straight line from forearm to bar only when the bar sits directly over the wrist and the wrist stays neutral. A bent wrist inserts a hinge into that line, bleeding pressure into the joint instead of the bar, which is why heavy sets leave the wrists aching and the lockout feeling spongy.
The fix is bar placement, not wrist strength. Set the bar low in the palm, on the heel of the hand, directly above the bones of the forearm, then wrap the thumb and squeeze hard. The cue: knuckles to the ceiling, bar stacked on bone. If your wrists still fold under heavy loads, wrist wraps can help, but they are a supplement to correct placement, not a substitute for it.
How to Check Your Own Form
Every mistake on this list shares one inconvenient property: you cannot feel it happening. Flared elbows feel normal, the bounce feels like strength, the wandering touch point is invisible from behind the bar. Your training partner watches your face, not your elbow angle, and the mirror is useless when you are staring at the ceiling.
Film yourself instead. A phone propped at chest height, square to your side, catches bar path, touch point, bounce, and elbow drift in a single angle; a front view from beyond your head checks grip symmetry and forearm verticality. Our guide on how to film your lifts covers the exact setups. Then review honestly, ideally between sessions when your ego has clocked out.
If you want a second set of eyes on the footage, HyperBody's video form check analyzes your bench press rep by rep and flags these exact patterns: elbow flare, bar path drift, lost tightness, inconsistent depth. Upload a set, get specific feedback per rep, fix one thing at a time. One technique error corrected often does more for your bench than a month of extra volume.
The Bottom Line
The bench press rewards setup and punishes improvisation. Tuck the elbows and touch low on the chest. Plant the feet and press the floor away. Lower under control and touch, never bounce. Pick one touch point and hit it every rep. Pin the shoulder blades back and down before the bar moves and keep them there. Choose the grip width your forearms vote for, not the one you copied. Stack the bar over your wrist bones and squeeze. Then film a set every week or two, because the lifter is always the last person to know. None of these fixes costs a single extra minute in the gym; together they are usually worth more kilograms, and more comfortable shoulders, than anything else you could change this month.
More field notes.

How Deep Should You Squat? Depth, Mobility, and Safety
Squat depth starts more arguments than almost any other topic in the gym, and most of the arguing ignores both the evidence and your individual anatomy. Here is what the research actually says about depth, knees, and muscle growth, and how to find the depth that fits your body.

Deadlift Form: Hinge Mechanics, Bracing, and the Faults That Hold You Back
The deadlift is the simplest lift to describe and one of the easiest to do badly, because every fault hides behind the bar still going up. Here is the full sequence, from setup to lockout, plus the five faults that cost the most strength and how to fix each one.

Tempo and Time Under Tension: Does Lifting Speed Matter?
Should you lift slow to maximize 'time under tension,' or explode through your reps? The research on lifting tempo is clearer than the gym debates suggest, and mostly, it tells you to relax.
More on HyperBody