ProgressJul 12, 20268 min read
Lire en français·Auf Deutsch lesen·Leer en español·Przeczytaj po polsku
How to Take Physique Progress Photos: Poses, Lighting, and Consistency
Progress photos are the most honest physique tracking tool you have, but only if you take them the same way every time. Here is the exact setup: five standard poses, lighting, camera position, and the consistency rules that make photos comparable.
Reviewed by the HyperBody team

Your scale weight moved a pound this month. What does that tell you about your physique? Almost nothing. It cannot tell you whether your shoulders look rounder, whether your waist is tighter, or whether the upper back you have been hammering for twelve weeks has finally started to show. Progress photos can. But only if you take them properly.
Most progress photos fail at the one job they have: being comparable. Different lighting, different angles, different times of day, a pump in one photo and not the other. Each variable adds noise, and enough noise drowns the signal completely. You end up staring at two photos, unable to tell whether your body changed or the conditions did.
This guide removes the noise. Five poses, one lighting setup, one camera position, a handful of consistency rules, and a cadence that matches how fast physiques actually change. Follow it and every photo session produces data you can trust.
Why Photos Beat the Scale for Physique Tracking
The scale measures total mass. It cannot distinguish a kilogram of muscle from a kilogram of fat, and it says nothing about where either one sits on your body. If you gain a kilogram of muscle and lose a kilogram of fat over two months, the scale reports zero progress while your physique visibly improves. That exact scenario, body recomposition, is common in beginners and returning lifters, and the scale is structurally blind to it.
The mirror is not much better, for a different reason. You see yourself every day, so changes that accumulate gradually never register. Your brain adapts to the image faster than the image changes. This is why a friend who has not seen you in three months notices your progress instantly while you see nothing.
Photos solve both problems at once. They capture shape, proportion, and muscle distribution, the things that actually define a physique, and they freeze a moment in time so your adapted eye cannot smooth it over. Put a photo from twelve weeks ago next to one taken today under identical conditions and the difference is either there or it is not. That honesty is the entire value, which is why everything below serves one goal: making your photos identical in every way except your body.
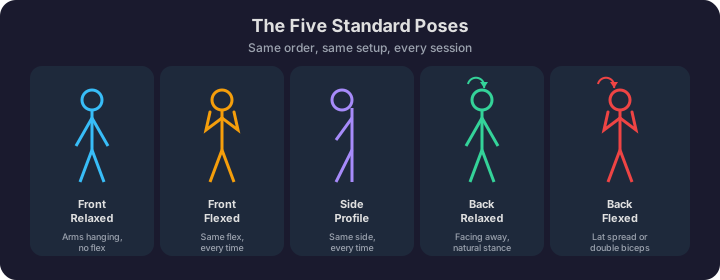
The Five Standard Poses
Five poses cover a physique from every informative angle. Each one reveals things the others hide, which is why skipping any of them leaves a blind spot.
1. Front relaxed. Stand facing the camera, feet roughly shoulder width apart, arms hanging naturally at your sides, palms facing your thighs. Do not flex, do not pull your shoulders back further than usual, and do not suck in your stomach. Exhale normally and let your body sit the way it actually sits. This is the hardest pose to do honestly and the most valuable one, because it shows your default state: natural waist, shoulder width, posture, and how your physique reads when you are not performing.
2. Front flexed. Same stance, then contract everything at once: quads, abs, chest, shoulders, and arms. Keep your arms at your sides with a light flex rather than raising them into a full double biceps, unless you prefer the double biceps, in which case use it every single time. The pose you choose matters far less than never changing it, because a flexed and a semi-flexed photo of the same body look like two different people.
3. Side profile. Turn 90 degrees so the camera sees one side of your body. Pick left or right once and keep it forever. Arms relaxed, eyes straight ahead, posture natural. This angle shows chest depth, stomach profile, glute development, and the postural patterns, rounded shoulders, anterior pelvic tilt, forward head, that front and back shots hide completely.
4. Back relaxed. Face directly away from the camera, arms at your sides, standing naturally. This shows back width, traps, rear delts, hamstrings, and calves at rest, plus left to right symmetry, which is nearly impossible to assess any other way since you never see your own back.
5. Back flexed. Still facing away, either spread your lats or hit a back double biceps. The double biceps reveals more upper back detail; the lat spread emphasizes width. Either works. Choose one and repeat it every session, because the two poses present the same back very differently.
One more rule for the flexed poses: flex at a consistent, repeatable effort. A maximal cramping flex in January and a casual one in March will mask real change. Aim for a firm contraction you can reproduce, not your hardest possible squeeze.
Lighting: The Variable That Lies the Most
Lighting changes how lean you look more than almost anything you can do in the gym in a month. A single overhead light carves shadows under your chest and into your abs and can make you look two or three body fat percentage points leaner than flat, frontal light shows. Neither photo is fake. They are just not comparable.
The fix is not finding perfect light. It is finding repeatable light:
- Same room, same light source, every session. Pick a spot in your home with even, reasonably bright light and never photograph anywhere else.
- Prefer diffuse, front facing light. Light coming from roughly the direction of the camera shows your physique most honestly. Strong overhead or side light flatters, and flattery is noise.
- Same time of day. If you rely on natural light from a window, it changes with the hour and the season. Shooting at the same time each session keeps it roughly constant; a consistent artificial light avoids the problem entirely.
- Never compare across setups. A gym mirror photo and a bedroom photo of the same physique on the same day can look like a before and after. Treat photos from different setups as different data sets.
Camera Setup: Distance, Height, and Timer
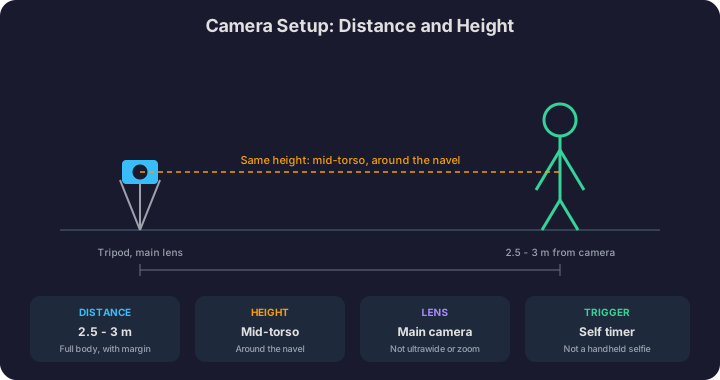
Phone cameras distort. How much depends on distance, lens, and angle, so all three need to be locked down.
Distance. Stand roughly 2.5 to 3 meters from the camera, far enough that your whole body fits in frame with margin above your head and below your feet. Up close, wide angle lenses stretch whatever is nearest the camera, which warps your proportions.
Lens. Use your phone's main camera, not the ultrawide and not a zoom setting you will forget by next month. Lens choice changes perspective, and perspective changes how your proportions read.
Height. Mount the phone at mid torso height, around your navel. A camera placed high and angled down shrinks your legs; placed low and angled up, it stretches them and narrows your waist. A small tripod or a stable shelf both work, as long as the height is the same every time.
Trigger. Use the self timer or interval shooting mode rather than holding the phone. Mirror selfies fix one arm in place, add a phone to every shot, and introduce angle drift, which makes the relaxed poses impossible to standardize.
Position. Put a piece of tape on the floor where you stand and another where the tripod goes. It feels excessive and it is the single cheapest consistency upgrade available.
Clothing and Consistency Rules
Wear fitted shorts or underwear, ideally the same pair or an identical one, in the same color. Loose shorts hide your quads; a waistband that sits higher or lower than last time changes your apparent waist height and leg length. Men typically shoot shirtless; women typically shoot in shorts and a sports bra. Whatever you choose, repeat it.
Two subtler variables worth controlling: tanning visibly increases apparent muscle definition, so a fresh tan in one photo set will exaggerate progress, and a dramatic haircut or grooming change can shift how your whole upper body reads. You do not need to freeze your appearance for months. Just note these changes so you do not credit them to your training.
How Often: Every 4 to 8 Weeks
Visible physique change is slow. Muscle accrues over months, and even a productive fat loss phase shifts your appearance gradually. Daily or weekly photos mostly capture water, food volume, sleep quality, and lighting luck, and watching that noise is demoralizing for no benefit.
Every four weeks is a sensible default during a cut, where change is faster. Every six to eight weeks suits a lean gaining phase, where change is slower. Whatever the interval, the conditions matter as much as the date: shoot in the morning, fasted, after using the bathroom, and before training. A post workout pump temporarily inflates muscle size and ruins comparability, which is exactly why pump shots feel so good and inform so little.
Photos are one layer of a complete tracking system, alongside strength logs and tape measurements. If you want the full setup, our guide on how to track physique progress covers how the layers fit together.
How AI Analysis Uses Standardized Photos
The five poses above are not arbitrary. They are the same five inputs HyperBody's photo analysis uses: front relaxed, front flexed, side profile, back relaxed, and back flexed. Upload them to the AI physique rater and you get a body fat estimate, muscle by muscle development scores, and a breakdown of proportions and weak points, all generated from the same photo session you were taking anyway.
Standardization is what makes this work. The analysis compares your photos against consistent reference poses, and your month over month results stay comparable for the same reason your own visual comparisons do: the conditions are fixed, so the differences are real. Sloppy photos degrade an AI's read on your physique just like they degrade yours.
Common Mistakes That Ruin Comparability
Pump shots. Training before photographing adds temporary size to whatever you just trained. Always shoot before the gym, not after.
Chasing flattering light. Hunting for the angle and shadow that make you look best produces great photos and useless data. Save the flattering shot for social media and keep it out of your tracking folder.
Drifting camera angles. A camera that creeps higher, lower, or closer between sessions changes your proportions on screen. Tape on the floor, fixed tripod height, same lens.
Flexing in the relaxed poses. Almost everyone unconsciously tightens up when a camera points at them. Exhale, drop your shoulders, and let the relaxed poses be genuinely relaxed. They are the baseline everything else is measured against.
Changing poses between sessions. A lat spread in March and a double biceps in May cannot be compared. Lock your five poses and never improvise.
Deleting bad sessions. Keeping only the photos where you look good biases your whole record upward and hides real plateaus. Every session goes in the folder, including the rough ones. Especially the rough ones.
The Checklist
Before each session, run through this: morning, fasted, before training. Same room, same light, same time of day. Phone on the main lens, mid torso height, 2.5 to 3 meters back, on a timer. Same fitted clothing. Five poses, front relaxed, front flexed, side profile, back relaxed, back flexed, each held the same way as last time. Then put the phone away and do not look at the photos side by side until the next session is done.
Eight weeks from now, you will have something almost nobody who trains actually has: proof. Either the plan is working and the photos show it, or it is not and the photos show that too. Both outcomes are worth far more than a flattering picture.
More field notes.

How to Track Your Physique Progress (Beyond the Scale)
The scale lies. Mirror selfies are inconsistent. Learn the methods that actually show whether your training is working and how to build a progress tracking system you can trust.

FFMI Explained: How Much Muscle Can You Build Naturally?
FFMI puts a number on how much muscle you carry for your height, and it is the metric behind the famous claim that natural lifters top out around 25. Here is what it actually measures, what the research really showed, and how to estimate yours.

Body Recomposition: Can You Build Muscle and Lose Fat at the Same Time?
Building muscle while losing fat sounds like having it both ways, but for several groups of lifters it is well documented. Here is who can realistically recomp, why it works, and how to tell it is working when the scale refuses to move.
More on HyperBody